


Friday, January 16, 2009
Hi everyone! Thought I'd take a break today from template sharing & show you my creative space instead. I took these photos last week & they've been sitting on a folder in my computer for some time now so I thought I'd purge them out to share :)
[WARNING: the mess you are about to see does not & will not classify me as an untidy person. ya, right.]
[WARNING: the mess you are about to see does not & will not classify me as an untidy person. ya, right.]
First of all, here's an overview of my desk and the main storage unit I use. Gotta love Ikea, no?
On the left you can see my Expedit cupboard + the extension desk with my laptop on top. On the right, you see my Frederick desk (yes, ikea again. most of the furniture I use are from them) I love the Frederick desk because it's large enough for me to work on & I can adjust the height of it according to what I like. [so if you prefer to sit/stand you can adjust when you're fixing it up]
I love that I have everything I need around me so I don't have to get up and run around. Yes, I'm a lazy scrapper :)
Let me break down how I store my scrap stuff further :) Ok, what's on my desk? These kitchen organisers are perfect for storing all the knick knacks & stuff I use very frequently. On the left basket I have my 6x6 paper pads, crop o dile etc & in the middle basket I have my acrylic blocks for stamping + my stamp-a-majig for the wood mounted stamps.
 Ok, what's on my desk? These kitchen organisers are perfect for storing all the knick knacks & stuff I use very frequently. On the left basket I have my 6x6 paper pads, crop o dile etc & in the middle basket I have my acrylic blocks for stamping + my stamp-a-majig for the wood mounted stamps.
 In the right basket I have my making memories eyelets, stickles, stamp cleaners, glossy accents + my postage stamps.

 On my desk, I got a paper/letter standing thingy [what do u even call that?] from my local stationery store to keep all my thickers/alphabet stickers sorted mostly by colour. I find that it's easier for me to flip through to find what I want really easily. Also, slightly cut off on the left side of the photo above is my revolving holder where I have all my scissors, rulers, glues & markers/pencils I use ALL the time.

I found this 'tool box' with tiny drawers from a hardware store. Perfect for storing the little embellishments!I think handymen use it to put tiny screws etc. This used to be on my trolley [which I'll show you further down on the post] but I realised that I tend to use what I can see in front me more. That way I remember what I have!
On to what's above of my desk:
 Don't you just love those little jars? These are little spice jars I got from Ikea for the cheap! I think it was $3 for 4 cute little jars :) I have in them buttons sorted out by colour, works so much better for me. I used to store them in one huge jar all mixed up, not so good.
Underneath the button jars is the CD holder also from Ikea that holds my papertreyink stamps [yes, they have their own special storage] & also my nestabilities in the cd cases on the right corner. I have my nestabilities stuck to magnetic strips that I adhered inside of the CD cases.
 To the right of the CD holder I have a photo holder from Umbra. This I got as a gift from my boyfriend for Christmas, I love it! I can now display all my recent cards without taking up too much space :)

 On my desk, I got a paper/letter standing thingy [what do u even call that?] from my local stationery store to keep all my thickers/alphabet stickers sorted mostly by colour. I find that it's easier for me to flip through to find what I want really easily. Also, slightly cut off on the left side of the photo above is my revolving holder where I have all my scissors, rulers, glues & markers/pencils I use ALL the time.
I found this 'tool box' with tiny drawers from a hardware store. Perfect for storing the little embellishments!I think handymen use it to put tiny screws etc. This used to be on my trolley [which I'll show you further down on the post] but I realised that I tend to use what I can see in front me more. That way I remember what I have!
On to what's above of my desk:
 Don't you just love those little jars? These are little spice jars I got from Ikea for the cheap! I think it was $3 for 4 cute little jars :) I have in them buttons sorted out by colour, works so much better for me. I used to store them in one huge jar all mixed up, not so good.
Underneath the button jars is the CD holder also from Ikea that holds my papertreyink stamps [yes, they have their own special storage] & also my nestabilities in the cd cases on the right corner. I have my nestabilities stuck to magnetic strips that I adhered inside of the CD cases.
 To the right of the CD holder I have a photo holder from Umbra. This I got as a gift from my boyfriend for Christmas, I love it! I can now display all my recent cards without taking up too much space :)
Next, on the right hand side of my desk where I have my cuttlebug, mini sewing machine etc. My embossing folders and dies are stored in their original packaging in the beside the mini sewing machine.

 Also from Ikea [see I told ya, I AM an Ikea fan!] is this set of metal drawers which were PERFECT to store my adhesives, embossing stuff, envelopes etc. I think it was around $80 [that's singapore dollars. In USD it would prob be around $60?] They're all sorted & labelled as below:
 I have my clear stamps in clear binder inserts. Easy to flip through & find what I want this way. Also, they each have a piece of printer paper as a backing.
 I used to display them on space racks but then I realised they dry up & turn whitish [NOT a good sign] because of the humidity level in Singapore. So I got this A4 paper organiser with drawers to store them. If I got anymore wooden mounted stamps, I can just buy another drawer unit to stack them up. Cool, huh? Most importantly though, my little precious ones are away from the sunlight & dust. :)
Ok, let's go under the desk now.
 Also from Ikea [they should really begin to pay me for publicity now] are these cardboard drawers that fit snugly into the expedit. I have my punches sorted by shapes here, before I just dumped them into a huge storage box [that fit into the expedit as well, but soon found it difficult to find what I want] This was just so much easier for me. Right above the punches I've got my 12x12 albums.

 Also from Ikea [see I told ya, I AM an Ikea fan!] is this set of metal drawers which were PERFECT to store my adhesives, embossing stuff, envelopes etc. I think it was around $80 [that's singapore dollars. In USD it would prob be around $60?] They're all sorted & labelled as below:
-embossing [everything that i need for dry & wet embossing]
-coloring tools [watercolour pencils, markers, waterbrush etc]
-tim, heidi & maya[ their stuff come in bulky packaging so they're all grouped together here]
-envelopes etc [pretty self-explanatory]
-chipboard letters etc [most of my chipboard are in here]
-adhesives
Next, I'd like to share with you how I store my clear stamps!
 I have my clear stamps in clear binder inserts. Easy to flip through & find what I want this way. Also, they each have a piece of printer paper as a backing.
 The cropper hopper 12x12 paper holder didn't exactly fit into the Expedit so I just snipped the top off & strengthened the corners with eyelets. It doesn't affect the papers inside, the cropper hopper just had extra room on the top.
On the right side I have my clear stamps in folders.
On the right side I have my clear stamps in folders.
Here's how I store my wood mounted rubber stamps:
 I used to display them on space racks but then I realised they dry up & turn whitish [NOT a good sign] because of the humidity level in Singapore. So I got this A4 paper organiser with drawers to store them. If I got anymore wooden mounted stamps, I can just buy another drawer unit to stack them up. Cool, huh? Most importantly though, my little precious ones are away from the sunlight & dust. :)
Ok, let's go under the desk now.
 Also from Ikea [they should really begin to pay me for publicity now] are these cardboard drawers that fit snugly into the expedit. I have my punches sorted by shapes here, before I just dumped them into a huge storage box [that fit into the expedit as well, but soon found it difficult to find what I want] This was just so much easier for me. Right above the punches I've got my 12x12 albums.
Next, how I store my ribbon. My guy promised to make me a ribbon spool holder of sorts but all he did here was drill 2 holes on the side of this ready made shelf to insert dowels. Not that I could complain, huh? :)
 The ribbon spools are mounted on the wall, right above my cuttlebug.
Next, my loose ribbons [the sort you buy by the yard/metre]. I have them sorted by colours & safety pin them in bunches, then i just hook them all onto a S hook. The Freerick desk has some holes on the side [which allows u to adjust the height of your desk, i just used those to my advantage]

Last but not least, my scrap trolley [ta-da!]
 I've labelled the photo, remember you can always click on it to see a close up. Mind you, I'm not the tidiest person but that doesn't mean I don't try :)
Can you believe I've only been scrapping for less than a year? Well, actually I started this hobby valentine's day of 2008. I don't think its excessive [although my friends think it is] -_-
 The ribbon spools are mounted on the wall, right above my cuttlebug.
Next, my loose ribbons [the sort you buy by the yard/metre]. I have them sorted by colours & safety pin them in bunches, then i just hook them all onto a S hook. The Freerick desk has some holes on the side [which allows u to adjust the height of your desk, i just used those to my advantage]

Last but not least, my scrap trolley [ta-da!]
My guy got this for me from a salon that was closing down, SO handy! It has bars all around that I hand S hooks on & I can move it around :)
 I've labelled the photo, remember you can always click on it to see a close up. Mind you, I'm not the tidiest person but that doesn't mean I don't try :)
Can you believe I've only been scrapping for less than a year? Well, actually I started this hobby valentine's day of 2008. I don't think its excessive [although my friends think it is] -_-
You know exactly what I'm talking about right? A girl can NEVER have enough *wink*
So there you go, I find that everyone has to organise according to what works for them. It's a CONSTANT job, always expanding & finding ways to place what where etc. But always enjoyable :)
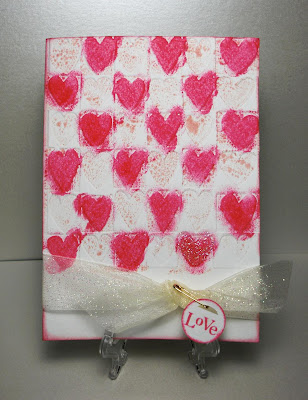 The cuttlebug smooshing is kinda subtle here, I used 'tattered rose' distress ink with the folder. Just smooshed the whole ink pad on the top side of the embossing folder {the side that shows on the front of the card}


