Showing posts with label copics. Show all posts

Butterflies

Tuesday, June 2, 2009

Here's a card I made at felicia's a week or so ago, and I got to play with some of her MANY stamps hehe! I love that gorgeous distressed heart background from Unity Stamp as well as the gorgeous Maya road butterfly stamps. Actually one of the prettier butterfly stamp sets I've seen :) I used a techique I learnt from Jennifer Mcguire, where you mix the pearl ex and water and then apply it over an image to give it a shimmery look. You could also use liquid dimensional pearls in the same way :) You can see the soft effect it gives from the photo below:
The inside is also stamped with another cute Maya road butterfly image and coloured in with Copics. I used Y11, Y38, YR04 and YR21 to colour in both the images on the front of the card and the one inside.

Oh, and I got a new job!! Yeay!!!
Thanks for stopping by today, have a good one :)

Card Supplies:
cardstock: papertreyink
stamps: unity stamp co, maya road, 'life' by papertreyink
others: copic markers, pearl ex, black marker

Share/Save/Bookmark


Wishing you happiness

Thursday, May 14, 2009

A wedding card share today, I coloured in the image with Copic markers & used some patterned paper from Basic Grey's bittersweet collection. Actually wanted to send this to a friend whose wedding I couldn't attend, but i ended up sending her another one instead. I learnt that you can colour the background with a copic marker and then use the colourless blender to soften the edges. This makes it look like it was airbrushed :) I think I got this tip from Debbie Olson. (link to her blog on the left bar under thinking inking blog)
The bouquet stamp is from a Rubber Soul wedding stamp set, I used the same set for the couple silhouette in a card share few days ago. The round dotted frame is from an old Heidi Swapp stamp set. Another tip when using copics, don't use versafine or stazon inks they will bleed! and most probably stain your marker nibs. I recommend Memento dye inks :)
Thanks so much for stopping by, have a nice one!
Share/Save/Bookmark

Tuesday Video: Copic Card

Tuesday, April 21, 2009

Happy tuesday! Remember this video I did a few weeks ago showing how I colour with Copic Markers ? Well here's the card that I made with the image :)Thanks Regina for the Magnolia image! It was fun to colour it in. The circle stamp used is from Unity Stamp co. & everything else is from Papertreyink. I got my colluzzle over at Joanns.
Here's the video:

Thanks for stopping by, I hope you enjoyed the video! Off to edit one I did for Scrapbooking for the Inside Out. (look out for that in May!)
Have a good one ;)

Share/Save/Bookmark


A card + some sewing

Friday, March 27, 2009

Hi everyone! How's your day going? A card share today plus a few new blogs that I'm excited about :) First up, another card submission I made for papertreyink's march guest star stamper: It took me so long before I finally decide to get the 'My Punny Valentine' set, TOO cute! And I put off getting it only because there were so many other sets that I needed to get first on a limited budget *lol* Well, I'm glad i finally got round to it, it's SO cute!
This card is 100% made up of scraps that I had lying around, feels good to use them up :) You've probably never seen that border punch before, only because it's NOT a border punch. It's actually a corner punch from Carl & I played around with it to make a border, turned out kinda cute if I may say so myself haha. The squirrel image is stamped with versafine & then i did some shading and highlight with my Copic markers. I used some colourless blender for the highlighting.
Thanks for the comments on yesterday's card, I think I'll make a video tutorial for that card what do ya say? :)
Ah, I found a great site yesterday while browsing. Have you heard of Sew, Mama Sew? If you love sewing you have to go check it out, they've got free sewing patterns as well as sew-along tutorials (totally great for someone like me!) Check it out here.
And I also really like The Crafty Crow, just look at all those lovely projects for kids! Almost makes me wish I had children :) Lots of free downloads & tutorials for lovely projects too. Ok, so give me kids NOW. haha
That's all for today, thanks for coming by!
Have a great one :)

Share/Save/Bookmark

Guest Star Stamper for March!

Tuesday, March 17, 2009

OH MY GOD, i couldn't believe my eyes when i received a mail from jennifer ellefson telling me i'd won the March Guest Star Stamper contest for papertreyink ! I'm so happy :)

Here's my winning entry :

I really had so much fun making this card, especialy when I was colouring the images in & creating the different backgrounds with stamps.

Here's a close up of the flowers:

I coloured in the flowers & leaves from the 'Friends till the end' Papertreyink stamp set with Copic Markers. I really love those markers, they give images such a rich colour!
I also created the yellow 'summer sunrise' cardstock background stamped with the all the different sentiments from the set lined up (fun to do plus another use for the sentiments) .
The green 'spring moss' cardstock background was stamped with the lines from 'Journalling lines' Papertreyink stamp set with black versafine ink & the bright 'raspberry fizz' cardstock was stamped with the 'polka dots basic' stamp set also from PTI.
The whole thing is then mounted on dimensionals & onto some 'dark chocolate' cardstock. I also added some buttons (threading them through with some leftover dark yellow thread I had lying around) to add more texture to the flowers.
What a great month it has been! Truly a great birthday present from Papertreyink :) Do check out the other 2 winners here, the official post isn't up on Nichole Heady's blog yet.
Thanks for stopping by, have a great day!

Share/Save/Bookmark

Friends Always..

Monday, March 9, 2009

Hi all! It seems I posted my Tutorial Tuesday a tad ealier hahahaha oh well! I just have to say I think i got the hang of video editing with Movie Maker. Not hard, just takes a tad more time :) You'll see better videos, some without me blabbing *lol* in the near future. So keep a lookout ;)
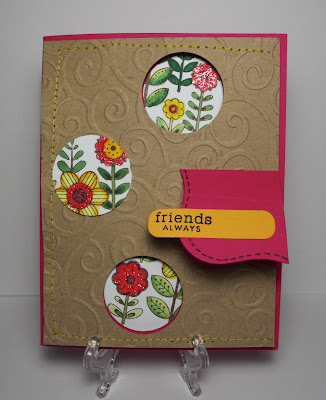
Ok, on to today's card: This card is dedicated to all my friends out there who gave me moral support during my mum's ordeal, thank you guys! I love ya! *you know who you are* I used a technique I picked up from one of Jennifer McGuire's video for this card & just added little twists of my own. I used the large flower stamp I got from Heroarts as my Honourable Mention win (link to this on left bar) The flowers are coloured in with Copic Markers. Pssst...I have a video coming up on Copics too *grinz*

So I played with my cuttlebug 'divine swirls' embossing folder and my sewing machine for this card as well as some scrap pieces of die cuts I had lying around. I must emphasize that it feels good to use up little pieces of scraps ( i force myself to use them by laying them in front of me when I create) that way i'll always reach out & try to incorporate them on my creations.
ps: papertreyink is having their monthly countdown beginning today, my heart goes pitter patter & my bank account is literally going 'Ka-Ching'. *lol*

Thanks for coming by today :)

Share/Save/Bookmark

I'm back!

Monday, February 16, 2009

Hi all! I'm back from my trip, how was your weekend? I hope it was great!! :) My Kuala Lumpur trip was a short one, but good times nonetheless catching up with dear friends.

By the way, did you check out Card Patterns yesterday? Their #2 Sketch is up, and remember! If you play along with your version of the sketch, you get to be a guest designer :) Here I am sharing with you the sketch as well as my take, I hope you like! Thanks in advance for any input :)


The background & sentiment is stamped with PapertreyInk's 'faux ribbon set' & the tree is an image from chatterbox. Thanks for stopping by, come back tomorrow for another birthday card share!
ps: i'm off to raid papertreyink right now *shop shop tralalla*

Share/Save/Bookmark

I couldn't help myself...

Tuesday, February 10, 2009

...I had to make another valentine card yesterday :) I told you I hadn't had enough fun with my 'Love Songs' set by Papertreyink! I love this shadow box card, totally a fun & easy card to make. Plus it lies flat for you to mail it as well, a nice card to place on the desk of whomever you give it to :)
I made a baby card before using this technique as well. Here it is.
I've also attached a video below by Dawn to show you how to make this shadow box card, she uses american measurements so for us girls on this side of the world you can just use an A4 sized cardstock, half that & fold. This fits perfectly into our normal card envelopes [which are easier to find]


supplies:
cardstock: local store & pti's berry sorbet, sweet blush
pattern paper: scenic route
stamps: pti 'love songs' & polka dot basics
others: copics, small oval scallop nestabilities, EK success heart punch

Share/Save/Bookmark

Valentine's Day cards ideas ! [pt 3]

Tuesday, February 3, 2009

This should be my last instalment of V-day cards this year, i hope you've enjoyed the ideas that I've shared with you & do let me know if you like any of them :) 4 cards today! First up, one of my faves:


An embossed card with subtle cream polkies! I had fun making this card & it doesn't take too long too! I'm so loving kraft cs right now.....the polkies & sentiment are from PapertreyInk's 'polka dot basics' & 'faux ribbon' set respectively and the hearts are punched out with a EK success punch.
I decided i wanted to make a humourous card, something you can give a friend for Valentines. Well, since V-day is obviously the season for all things chocolate so I thought this sentiment went perfect with the candy store image. Images are from Unity stamp co & are then coloured in with Copics.


Next up a card with a hug! The cute image is from Rachelle Anne Miller & all ribbons & papers are from papertreyink. The sentiment from pti says 'two hearts, one love' & is from their wedding favors set. This card has glitter all over, it probably doesn't show up that well in the photo but remember you can always click on any of them for an enlarged look !


Last but not least, a simple card using the nestabilities labels one & my fave bg stamp from Stampington & co. The ribbon is from papertreyink.


Just a note, all Valentine cards are for sale so let me know if you see something you like soon before they're gone ! There are some which are not for sale but will gladly reproduce for you so drop me a msg :)

Off for a night out with the girls tonight, we're going to catch bridal wars. Can't wait! Have a great day :)


Share/Save/Bookmark


Folded Pop-Up Card Tutorial

Sunday, February 1, 2009

Hello peeps! A simple tutorial for you today. Let's get started! Here's what the card looks like on the outside, but an image will pop up when you open up the card. A little twist away from the conventional pop up card style, I hope you'll try this idea :)


I hope you like it! Just drop me a msg/comment if you're unsure about anything :) Oh, and PapertreyInk's giving away stamp sets as we speak! Go check out Nichole Heady's Blog. It's their 2nd anniversary so lots of exciting stuff going on there :)
Share/Save/Bookmark

simple & sweet

Saturday, January 31, 2009

Hi all! A simple & sweet card to share with you today.
I love this image from Magnolia & it was really fun to colour it in with Copics. Magnolia is actually a company from Scandinavia but now they're available in the US. I must mention I don't own any of them yet, all the stamped Magnolia images were given to me by friends. I'm yet to be convinced to pay US$12 + intl. shipping for 1 image *lol* Nevertheless, they have really cute images like this Tilda one. The chair image is sold separately & is also from Magnolia. The sentiment is from PapertreyInk's 'Love Songs' set.
Ok, so I'm tying up the loose ends on the tutorial I talked about last week. It probably has to be a photo tutorial, i still haven't got around to figuring out the vdo feature yet.
So! Come by tomorrow to check out a 'folded pop-up card' tute :)
Happy Saturday peeps!

Share/Save/Bookmark


heartfelt & brewing...

Friday, January 30, 2009

....love!

Still feeling glad I'm back home taking the time to sit down & sip on my tea,not rushing around for the chinese ny festivities. The atmosphere in Singapore for CNY is, I admit, better but really what is the point of atmosphere if not for the presence of family? Family's what it's all about at the end of the day isn't it?

Anyways, still being on holiday as it is enabled me to make a few more cards. Love-themed one, that is. I hope you likey :)
First up, I've got a card I made yesterday for the Heroarts 'heartfelt' challenge this week.

The idea is to stretch the way you use your stamps, so I made a few 'petals' with a heart stamp, rolled the edges around a pencil & made like a flower. All stamps are from HA except the polka dot line from PTI. Check out the HA challenge here.

Next up, a simple card with my fave subject. Tea! :)

I love this little teacup image from Lizzie Anne's singles, it was so perfect with the sentiment from PTI's 'wedding favors'. The teacup image was stamped twice, coloured in with Copics, cut out then dimensionalised. The small hearts are stamps form PTI's 'love songs' set. Love it :) I'm kinda hoping to get a tea related stamp set soon, I've been holding back for a really good one. Anyone have any ideas where I can find a good one?

In the meantime, Happy Friday!

Share/Save/Bookmark


The box i was talking about...

Saturday, January 24, 2009

...and 2 more cards to share!
Ok, I know yesterday I said I'm done blogging for this week but I had to share these! Too cute not too *grinz*
So I was talking about this gable box tutorial from Splitcoast Stampers, and I made 2! Aren't they cute???
I'm loving the Raspberry Fizz paper from PapertreyInk. You can find those here. I also used their summer sunrise & dark chocolate paper for the above gable box as well. Actually now that I look at it, everything's from PTI! You know u're in love when you use them unconsciously :) The stamp set is 'Love Songs', full of adorable images & sentiments. Definitely one of my faves.

Next, I made a baby blu-ish gable box for my friend. [she requested this color combo for her bf]

The stamps for this box is from Heroarts, it's actually part of a round journalling stamp. I just taped off the parts I didn't want, inked the image & removed the tape before stamping. Easy technique to get the part you want from any stamps :)

On to the cards:

CardPositioning systems challenge this week was to use any past sketches so I chose #87 [this one] for the card above. I did the colors for the background with a brayer & a rainbow ink pad. Then I stickled the main flower & adhered pink bling onto the centre of the stamped flower images.

You can hardly tell from the photo but the large dots on the background are stamp-kissed with another heart stamp I had. I also added a butterfly by stamping it with StazOn on a transparency, cut & colored it with copics and adhered it next to my sentiment with glossy accents.


So after some bold colours I was in a softer baby pink mood [again] so I used pti's sweet blush paper for this. Love the soft colour! I then embossed the front with my square nestabilities & cuttlebug to create a frame around my sentiment & image.

The stamp is from IOD & I used copics to color the image . The stamp is actually a 2 tiered cake stand with cupcakes on top, I just snipped off the top part & used that for the inside of my card.

The sentiment is from autumn leaves & I heat embossed that with fine details gold embossing powder. I hope you likey!

Ok, I'm off for some last minute packing, enjoy your weekend :)
Share/Save/Bookmark

Valentine's Day cards ideas ! [pt 2]

Friday, January 23, 2009

Hi & welcome to V-day card ideas part 2!

I've got 3 cards to share with you today, just to load u up with ideas before I fly off tomorrow :) Jakarta's internet connection is lack lustre so i don't foresee any blogging until next thursday :(
Anyways, I'm trying to make videos [with help from T ] on the tutorial I was telling you about, I have NO inkling whatsoever of video editing software so pls bear with me. It WILL be out soon [vdo or photo tutorial]
In the meantime, let's get on to the cards! I absolutely adore this PP from Teresa Collins, the stripes is the other pattern on this double sided PP. For the heart accent, I punched 2 large hearts.
-Using my large heart punch from EK I just punched out the PP & flipped it over to adhere on the front.
-a smaller heart punch in the middle of the PP heart
-another large heart punched out from DCVW glitter cs & used as a backing for the PP heart.
After putting everything together with dimensionals, I adhered a smaller glow in the dark heart sticker smack in the middle of the heart opening. Cute, huh? I like the graphic look :)

Let's move on to my 2nd card:


I got these really adorable Cosmo cricket blackboard not too long ago from a spree & I was excited to find that I had matching sentiments from my papertreyink 'faux ribbon' stamp set. The pink faux stitching is stamped using the same set as well.
The cute little truck is covered with7Gypsies savannah pp & the bunch of hearts image in the truck is from PTI's 'love songs'.
I finished the card inside as well:
The sentiment inside the card is from Heroarts & those little hearts you see at the bottom is from the 'love songs' set as well.
All paper & ribbons used are from PapertreyInk. Personally I think the above card is my fave :)

Last but not least, here's a cardshare as well as one of my entries for the Heroarts 'valentine' challenge over at their blog.
It's nice to be able to use this set from Heroarts again, I wanted something abit more 'mother & child' themed & the stamps worked it's own way into this card. I firstly stamped the large bird image on my white base & cut out the tail feather part aligning on a straight edge i drew earlier on with a pencil. [does this make sense?] I think there was a video on this by Jennifer Mcguire not too long ago, can't seem to find it :(
Anyhoooooss, I stamped the image multiple times on white cardstock & coloured it in with my Copic markers. Then I paper-pieced the bird with dimensionals.
The patterned paper is from the basic grey offbeat collection & the polkies background + sentiment is from papertreyink.
That's it for this week, here's wishing everyone a great Chinese New year!
And to the rest of you who don't celebrate this occasion, enjoy your weekend, thanks so much for popping by :)
eta: There's a really cute Gable box tutorial over at Split coast stampers this week, I made one last night and it's SO cute! Check the tutorial out here. Another great box for Valentine's :)
Share/Save/Bookmark